How to make a 360° render in 3ds Max with Corona
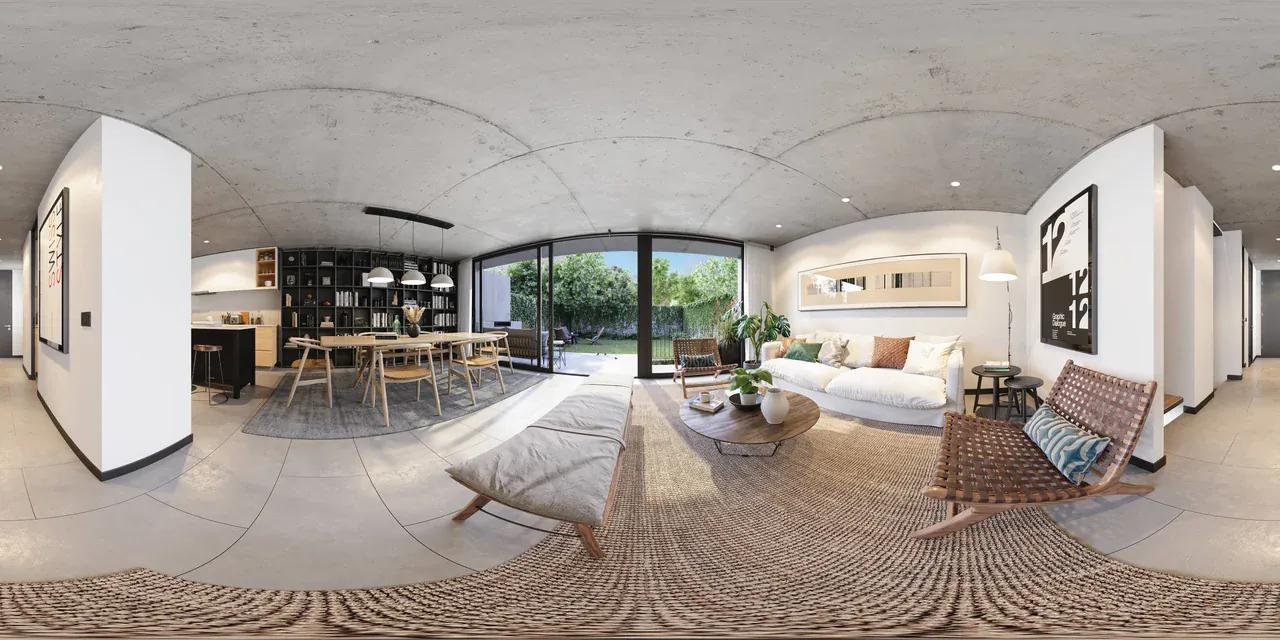
To make a 360° render with Chaos Corona in Autodesk® 3ds Max®, you add a Corona Camera to the scene, change its type to Spherical 360° in the camera’s Projection & VR section, and set the output resolution to 2:1 (for example, 8192 × 4096). Materials, lights, and the rest of the render settings stay as they are in a regular render. Once uploaded to virtual tour software, the resulting JPG or PNG file becomes a scene you can look around in every direction.
The screenshots were taken in 3ds Max 2024 with Corona 12. The setting names were checked against the current Chaos documentation (Corona 16, November 2026). Where there is a difference, the step in question says so.
Quick reference
| Setting | Where | Value |
|---|---|---|
| Camera | Create → Cameras → Standard → CoronaCam | Not a regular camera or CoronaCameraMod |
| Projection | Modify → Projection & VR → Type | Spherical 360° |
| Resolution | Render Setup → Common → Output Size | 2:1, e.g., 8192 × 4096 |
| Camera height | Camera position | 1.5–1.6 m above the finished floor |
| Camera angle | Camera direction | Perfectly level: not tilted up, down, or sideways |
| Noise limit | Render Setup → Scene → Progressive rendering limits | Noise level limit: 2–3 |
| Denoising | Render Setup → Scene → Denoising → Mode | Corona High Quality |
| Saving | Corona VFB → Save | JPG or PNG |
Below you’ll find the reason behind each step and what to watch out for.
1. Add a Corona Camera
- In the Command Panel, open the Create tab and click the camera icon (Cameras).
- Make sure Standard is selected in the list.
- Under Object Type, click the CoronaCam button and place the camera in the scene.
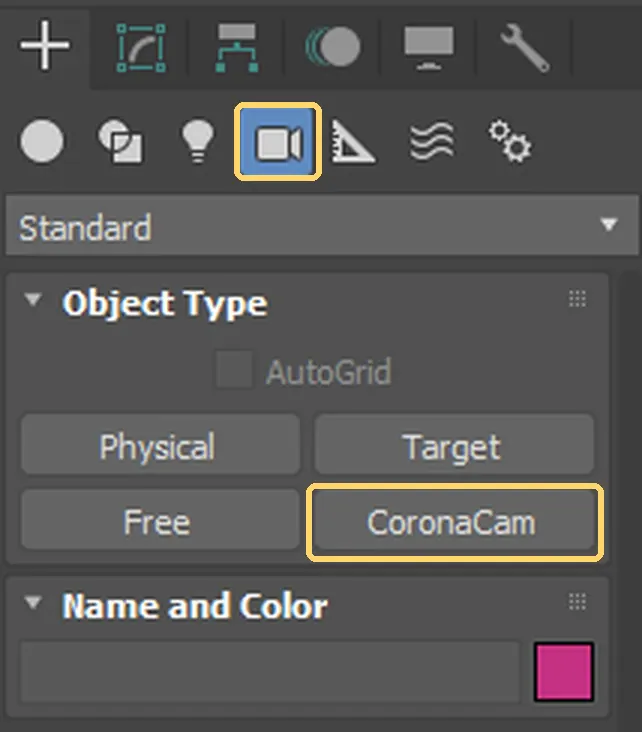
Image note: Autodesk screen shots reprinted courtesy of Autodesk, Inc. Annotations by Prewalk.
In Corona 12 the button is called CoronaCam, while the Chaos documentation calls it Corona Camera. They are the same camera.
Why the Corona Camera? Spherical, VR, and fisheye projections exist only on the Corona Camera; 3ds Max’s regular cameras don’t have this option. The old CoronaCameraMod modifier is kept only for compatibility with old files; don’t use it for new work.
2. Put the camera in the right place at the right height
Each camera becomes one scene in the tour. Put the camera where a visitor would stand: in the middle of the room, just inside the door, on the balcony.
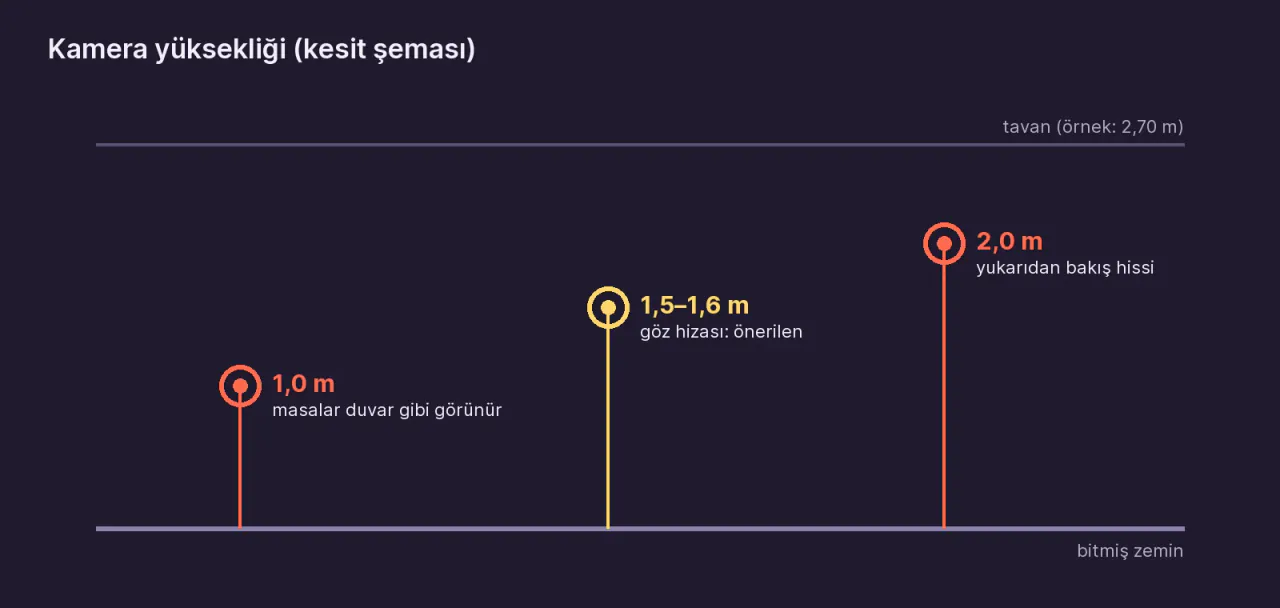
- Height: 1.5–1.6 m above the finished floor. Any lower and tables look like walls; any higher and visitors feel as if they’re up a ladder.
- Distance: Don’t put the camera too close to walls or furniture. Nearby objects look huge and distorted in a spherical image. Chaos also recommends leaving some distance between the camera and objects in 360° renders.
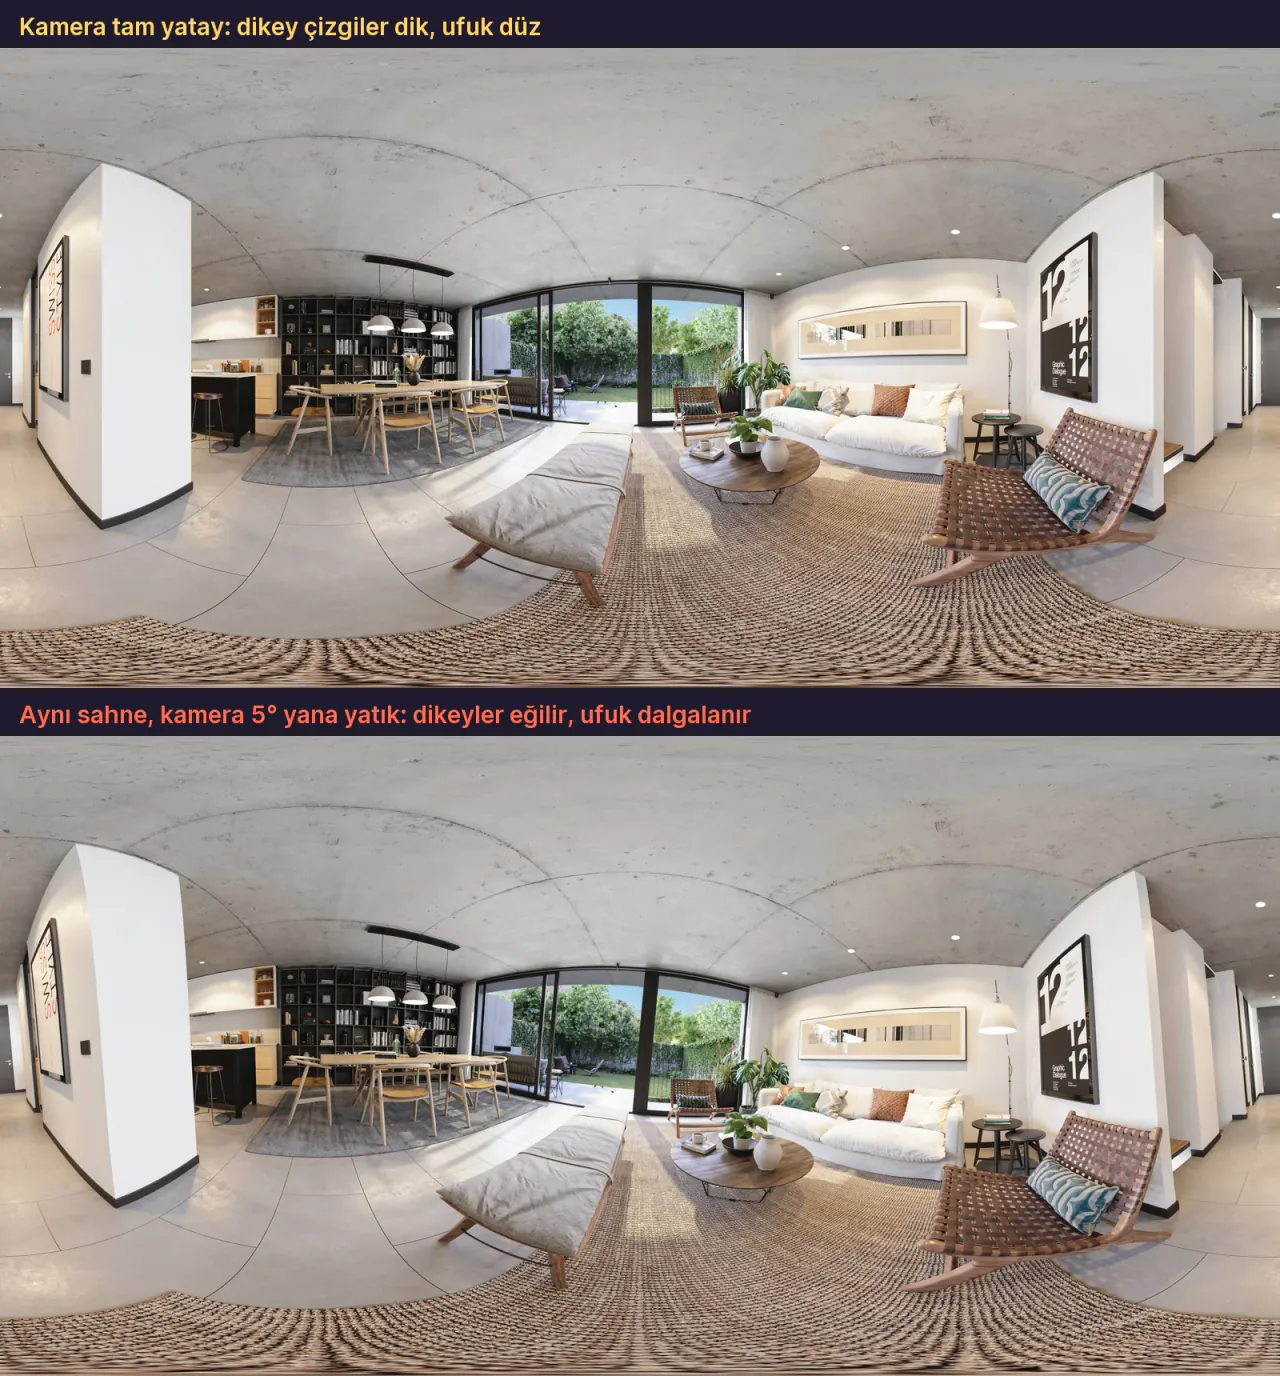
- Angle: The camera must be perfectly level. If you use a target camera, put the target at the same height as the camera. There must be no sideways tilt (roll).
A tilted camera means a tilted horizon, both in the tour and in a VR headset. In the image below, we recalculated the same render as if the camera were tilted 5° to the side. Look at how the vertical lines bend.
3. Set the projection to spherical 360°
- With the Corona Camera selected, switch to the Modify tab.
- Scroll down the panel and open the Projection & VR section.
- Choose Spherical 360° from the Type list.
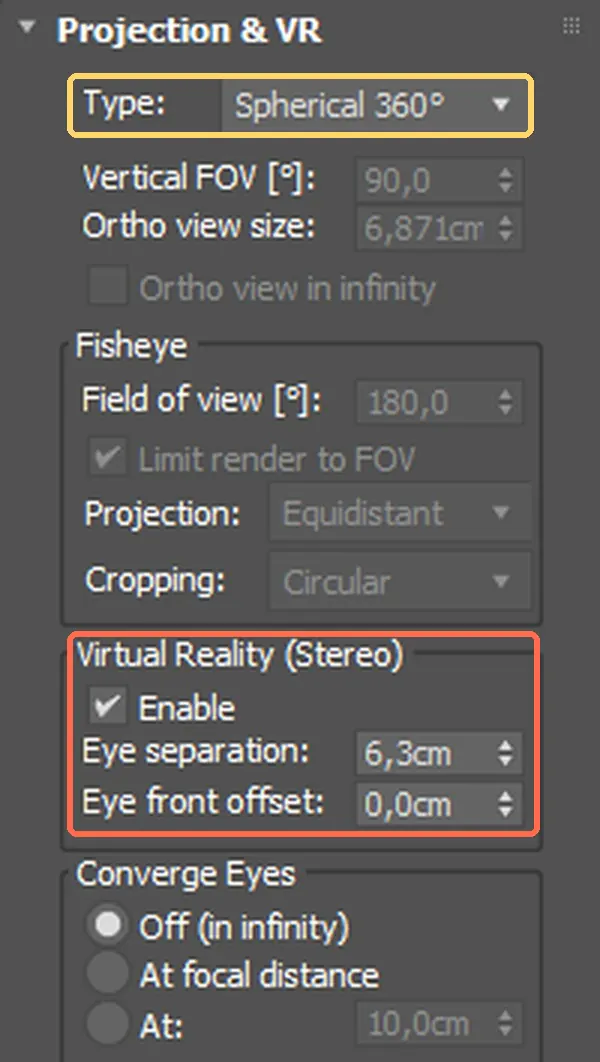
Image note: Autodesk screen shots reprinted courtesy of Autodesk, Inc. The panel is part of the Chaos Corona plugin. Annotations by Prewalk.
The Type list has six options: orthographic, perspective, spherical 360°, cylindrical 360°, cube map 360°, and fisheye. The right one for a virtual tour is Spherical 360°. The orange frame in the image marks the stereo settings; you only need them in step 8, for VR.
- cylindrical 360°: doesn’t fully cover the ceiling and floor.
- cube map 360°: produces six square faces. Most tour software, Prewalk included, doesn’t accept this layout.
You can’t see it in the viewport. The viewport shows only perspective and orthographic projections correctly; it doesn’t show the spherical image. To check the framing, do a small test render.
4. Set the resolution to 2:1
In Render Setup → Common → Output Size, make the width exactly twice the height. A spherical image covers 360° horizontally and 180° vertically, so the ratio must be 2:1.
| Use | Resolution | Note |
|---|---|---|
| Quick test | 2048 × 1024 | For checking framing and lighting |
| Phone and computer | 8192 × 4096 (8K) | The upper limit of the Prewalk Free plan |
| Close-up detail, large screen, VR | 16384 × 8192 (16K) | Pro and above; render time increases noticeably |
The post 8K or 16K: which resolution do you actually need? compares which one is enough for you.
A separate resolution for each camera. Since Corona 15, each Corona Camera can override the global resolution on its own: Image resolution override in the camera’s Overrides section. If you render both regular frames and 360° renders in the same scene, you won’t have to change Render Setup every time.
5. Set the quality: noise limit and denoising
A 360° render takes longer than a regular frame of the same scene, because Corona calculates the light for the whole sphere. Use limits to decide when the render stops:
- On the Render Setup → Scene tab, find the Progressive rendering limits section.
- Enter a Noise level limit value. According to Chaos, 2–3 is usually acceptable for final renders.
- If you like, set a Time limit as well. Corona stops at whichever limit it reaches first.
- Under Denoising → Mode, choose Corona High Quality. Some Chaos documents list this option under its new name, Corona Denoiser.
Marks at the poles or along the vertical seam. If you see a thin mark at the very top or bottom of the render, or where the left and right edges meet, the fix Chaos recommends is this: under Render Setup → System → Frame Buffer, set Image filter to Tent instead of High Quality. The Chaos article describing this problem was written for older versions. If there’s no mark, you don’t need to change the setting.
6. Save the render as JPG or PNG
When the render finishes, click Save in the Corona VFB window and choose JPG or PNG as the file type. JPG and PNG save the image you see in the VFB: tone mapping and post-processing settings are baked into the file.
Two formats to avoid:
- CXR: It’s Corona’s own format. Tone mapping and post-processing aren’t baked into the file but stored as settings. It’s good for editing later, not for uploading to a tour.
- EXR / HDR: Many tour platforms, Prewalk included, don’t accept them. Convert to JPG, PNG, or TIFF first.
Name the files after the rooms:01-entrance.jpg, 02-living-room.jpg. In Prewalk, the file name becomes the scene name.
Automatic saving. If you want the render to save itself, go to Render Setup → Common → Common Parameters → Render Output → Files... and choose a file path and the JPG or PNG format. Chaos recommends this method for Corona as well.
7. Render several cameras in sequence
If you’re rendering a whole apartment, you don’t need to start each camera one by one. 3ds Max’s Batch Render tool works with Corona:
- Open the Rendering → Batch Render window.
- Click Add to add a task, and choose a Corona Camera from the Camera list.
- Set an output file for each task, and repeat for the other cameras.
- Click Render to start them all in sequence.
If you keep each camera’s 2:1 resolution inside the camera with Image resolution override from step 4, nothing gets mixed up in the batch render.
8. Stereo render for VR (optional)
A regular (mono) 360° render looks flat in a VR headset, because both eyes see the same image. For real depth, you need a stereo render:
- In the Corona Camera’s Projection & VR section, check the Enable box under Virtual Reality (Stereo). Corona renders both eyes’ images at the same time, within the resolution you chose.
- Eye separation is the distance between the two eyes. In Corona 12, a new camera comes with a value of 6.3 cm. If the scene is modeled at real-world scale, this value works correctly.
- The Converge Eyes section has three options: Off (in infinity) (the default), At focal distance, and At (you enter the distance). If you choose a distance, the lines of sight of the two eyes cross at that distance. Chaos recommends using the average distance to the walls, or a larger value if you’re not sure.
According to the Chaos support page, Corona supports only the top-bottom layout for VR panoramas. Prewalk also expects stereo in this layout:
- two spheres stacked one above the other,
- a square (1:1) file, up to 16384 × 16384,
- left eye on top,
- on Pro and above.
In the top-bottom layout, the two images sit one above the other in a square file. So set a square resolution, for example 8192 × 8192.
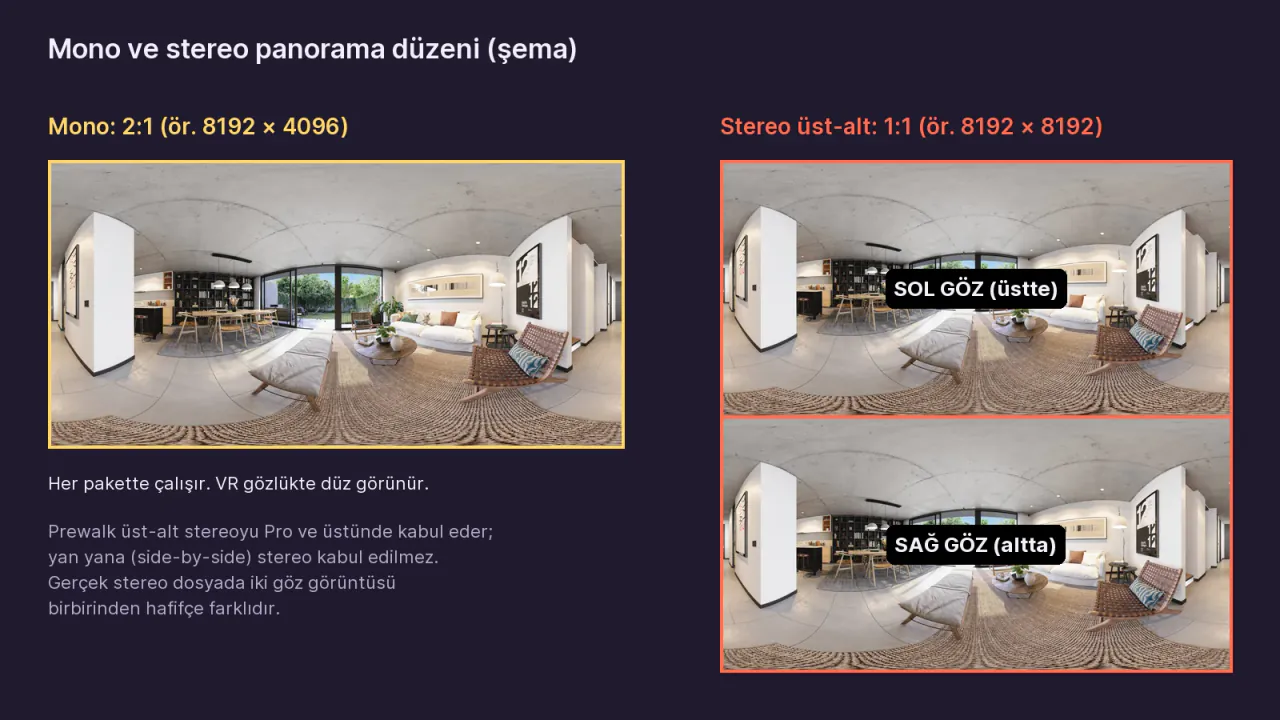
Check the eye order. The Chaos documentation doesn’t say whether Corona puts the left eye at the top or the bottom of the stereo file. Open the tour on a Meta Quest and look: if nearby objects seem far away and distant ones seem close, the eyes are swapped. In that case, swap the top and bottom halves of the file in an image editor and upload it again.
The post What is a stereo 360° render? explains the difference stereo makes in the headset.
9. Turn the renders into a virtual tour
Once you have a 2:1 JPG for each room, the tour takes a few minutes:
- Create a project and a tour in Prewalk Studio.
- Drag in all the renders at once. Each file becomes a scene.
- Link the rooms with hotspots. Hotspots are one-way, so add two for every doorway.
- Save the opening view in each scene, then publish.
The whole process, including shooting with a camera: How to make a 360° virtual tour. Button by button in Prewalk: Your first tour in 10 minutes. The logic of hotspots: Linking rooms.
Tour note: A tour made from 360° renders. Drag to look around, and click the rings on the floor to move between rooms.
Common mistakes
- Looking for spherical on a regular camera. Spherical projection exists only on the Corona Camera.
- Approving the framing in the viewport. The viewport doesn’t show the spherical image. Do a small test render.
- A resolution that isn’t 2:1, for example 8000 × 4096. The tour software rejects the ratio.
- Choosing cube map 360° or cylindrical 360°. A tour needs spherical 360°.
- Trying to upload CXR or EXR. Save as JPG, PNG, or TIFF.
- A tilted camera. The horizon can’t be fixed in the tour.
Frequently asked questions
Can I upload Corona’s CXR file straight to a tour? No. CXR is Corona’s own format, and tone mapping isn’t baked into the file. To upload to a tour, save a JPG or PNG from the VFB.
Should I render at 8K or 16K? For tours viewed on phones and computers, 8192 × 4096 (8K) is enough. If visitors will zoom in on details such as joinery or fabric, or the tour will open in a VR headset, 16384 × 8192 (16K) makes a difference, but render time increases noticeably.
Can I turn a regular render into a 360° one? No. For a 360° image, the camera has to render with Spherical 360° projection from the start. Cropping a regular frame to 2:1 doesn’t produce a sphere.
How many cameras should I place? At least one camera per room. Extra cameras in hallways and doorways make moving between rooms feel natural.
Corona’s own tour option
Chaos also offers a way to turn Corona renders into a virtual tour through Chaos Cloud. If you want to turn your renders into a tour that opens from a single link on phones, computers, and Meta Quest without an app, show it in your portfolio, or embed it on your website, try Prewalk for free.
Brand note: Autodesk and 3ds Max are registered trademarks or trademarks of Autodesk, Inc., and/or its subsidiaries and/or affiliates in the USA and/or other countries. Corona and Chaos are trademarks of Chaos Software. This guide was written independently; Prewalk is not affiliated with Autodesk or Chaos, and this guide is not endorsed by them.
Sources
- Chaos, Corona Camera (Projection & VR)
- Chaos, Corona Camera and panoramic projection
- Chaos, top-bottom layout only for VR panoramas
- Chaos, progressive rendering limits
- Chaos, recommended noise level
- Chaos, denoising modes
- Chaos, saving from the VFB and CXR
- Chaos, saving with Render Output
- Chaos, marks at the poles and the seam
- Chaos, 360° render tips (Cinema 4D article; 2:1 and a level camera)
- Autodesk, Batch Render
- Chaos, Corona 16 release notes
Share: Share on X LinkedIn WhatsApp